Basic Knowledge
This chapter introduces the fundamental knowledge related to Android automation. Please be sure to read this chapter carefully, as it will not be repeated later. Android automation differs significantly from conventional web automation, but they also share many similarities. In conventional web automation, you can easily view the page layout, element IDs, and other information through the F12 developer tools, then use XPath to locate elements for clicks, waits, and other operations. The logic for the Android environment is similar; you can also select elements using something called a selector and perform clicks, judgments, and other operations, so you don't need to worry about it being difficult to get started.
Similarities and Differences Between Mobile and Web Automation
There are many similarities between mobile and web automation, as well as some differences. Let's take Selenium as an example: usually, three things are needed to control a web page with Selenium: first, a browser; second, a WebDriver; third, Selenium. The mobile end is analogous: the phone acts as the browser, FIRERPA acts as the WebDriver, and FIRERPA's Python client library lamda acts as Selenium. They all share the same goal: to simulate user operations for testing, data collection, or automated task execution. They all drive through scripts, locating elements, clicking, taking screenshots, making judgments, and so on. From this perspective, they are quite similar.
However, they also have differences. First, mobile automation requires a phone and a computer, while web automation can be done on your own computer. Second, they use different sets of tools. Common web tools include Selenium, Puppeteer, and Playwright; common mobile tools include FIRERPA, AutoJS, Appium, uiautomator2, etc.
For web, common element location methods are mainly XPath or CSS selectors based on the HTML DOM structure, and the element hierarchy is relatively intuitive. For mobile, the common location method is the selector; of course, Android application interfaces also use XML layouts, so you can also use XPath via XML. Generally, web automation doesn't require much consideration of compatibility issues; in most cases, fixing the browser version and launch resolution can resolve compatibility problems caused by device differences. But for Android, differences in brand, model, screen size, system version, etc., may affect the compatibility of automation code. However, don't worry too much—while there is an impact, it is limited.
Differences Between Various Automation Tools
As mentioned earlier, there are also significant differences among the commonly used Android automation tools we cited. First, let us state our position: FIRERPA is the most stable, feature-complete, powerful, and most suitable for project-based management and application among all automation tools.
Note
Our position is not biased; it is formed through 6 years of continuous exploration and optimization. We have basically experienced the routes you have taken and the pitfalls you have encountered.
Common AutoJS and its derivative products belong to the "self-control" category, requiring an APK to be installed on the device and scripts written in JavaScript to perform operations. AutoJS is generally only capable of automated operations, with the advantage of being suitable for beginners or hobbyist use, with a low entry barrier. However, its design is not suitable for large-scale script control, management, and updating, and it exists in a decentralized, unmanaged state, making precise large-scale control impossible.
Basic Automation Process
Usually, you need to first research the solution: whether to perform only conventional automation, or to obtain application runtime data while automating. There are usually two data acquisition methods: first, intercepting HTTP/S communication via a man-in-the-middle approach; second, intercepting data via hooking. The man-in-the-middle method is relatively simple and suitable for general use, but may not work for some applications. The hooking method requires significant reverse engineering knowledge, is difficult for beginners, and is suitable for edge cases.
Man-in-the-Middle Data Acquisition
The man-in-the-middle approach is relatively simple. You just need to refer to the documentation for Installing the MITM Certificate and Setting Up the Proxy, and use them with mitmproxy to achieve this. If you're not sure, you can refer to the official startmitm.py script, which already contains all the logic, ready for you to copy or reuse.
Hook Data Acquisition
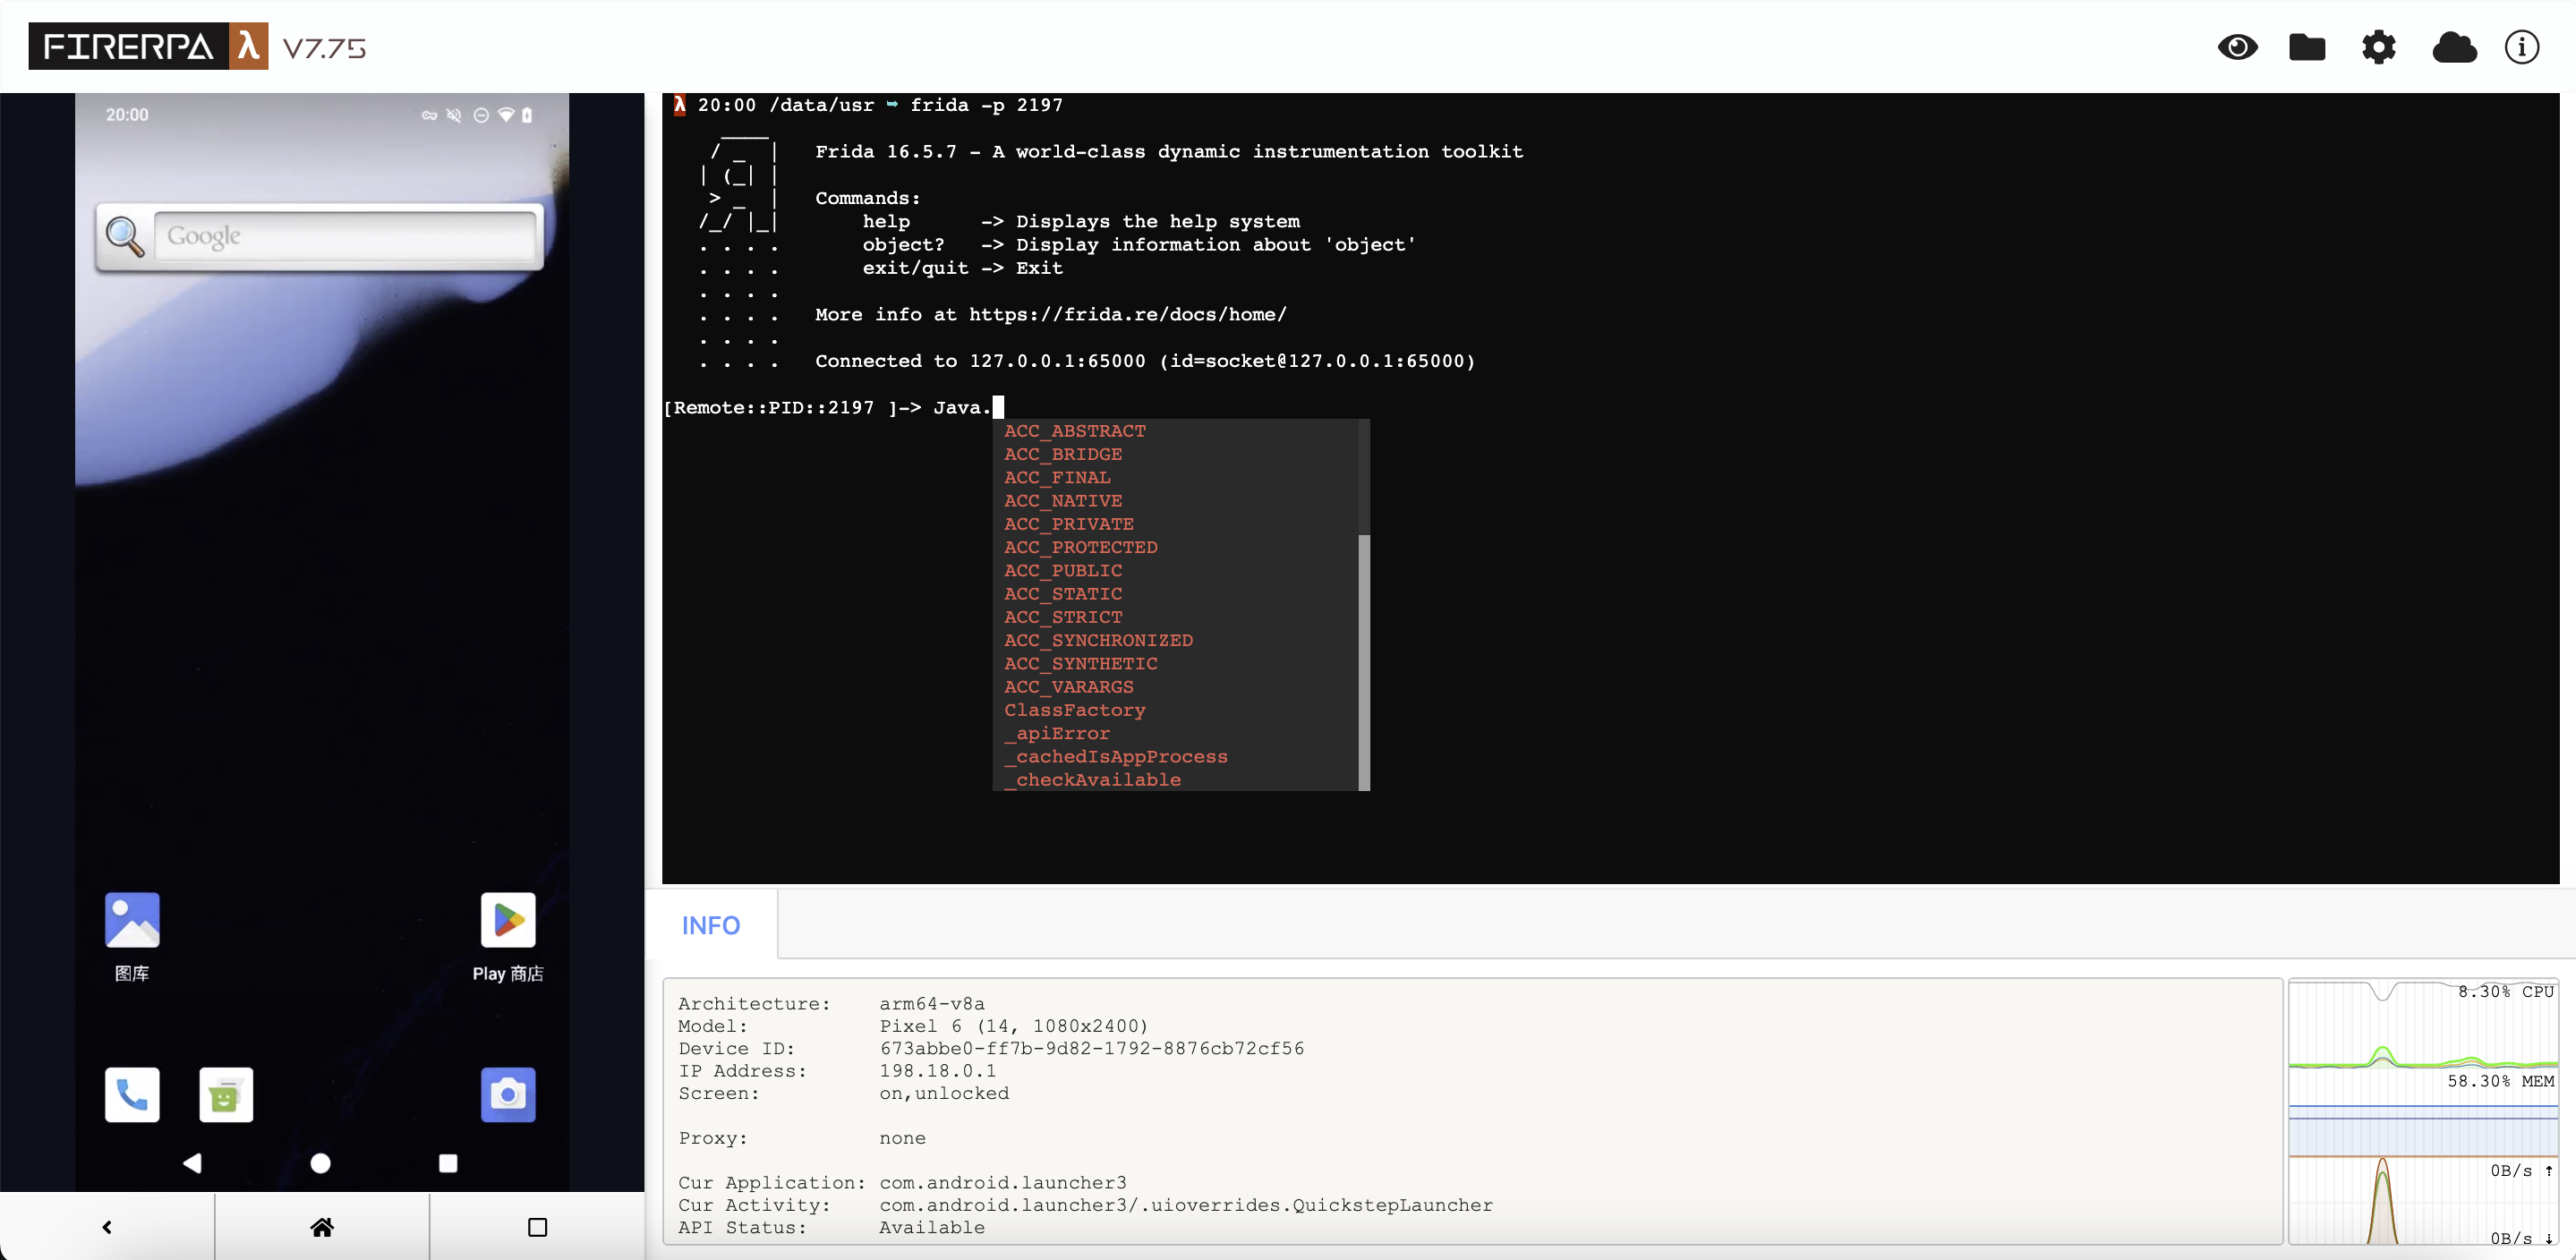
The hooking method requires at least a beginner level of reverse engineering ability. If you haven't encountered it before, you can put it aside for now. In general, the hooking approach involves writing Frida scripts to hook relevant function calls, capture parameters or return values and submit them, then inject them into the application, and so on. You can find simple demos and usage in the Using Frida to Report Data chapter.
Automation Code
Automation code is also indispensable, because you need automation to trigger the relevant logic. Writing automation code generally follows this process. First, open FIRERPA's remote desktop, and you will see the following interface.
Now, open the APP you want to automate, then click the "eye" icon in the upper right corner of the remote desktop. You will see the interface below. At this point, select the element you want to operate, and click to view the element information.
Tip
Of course, you can also open it through code; we'll cover that later.
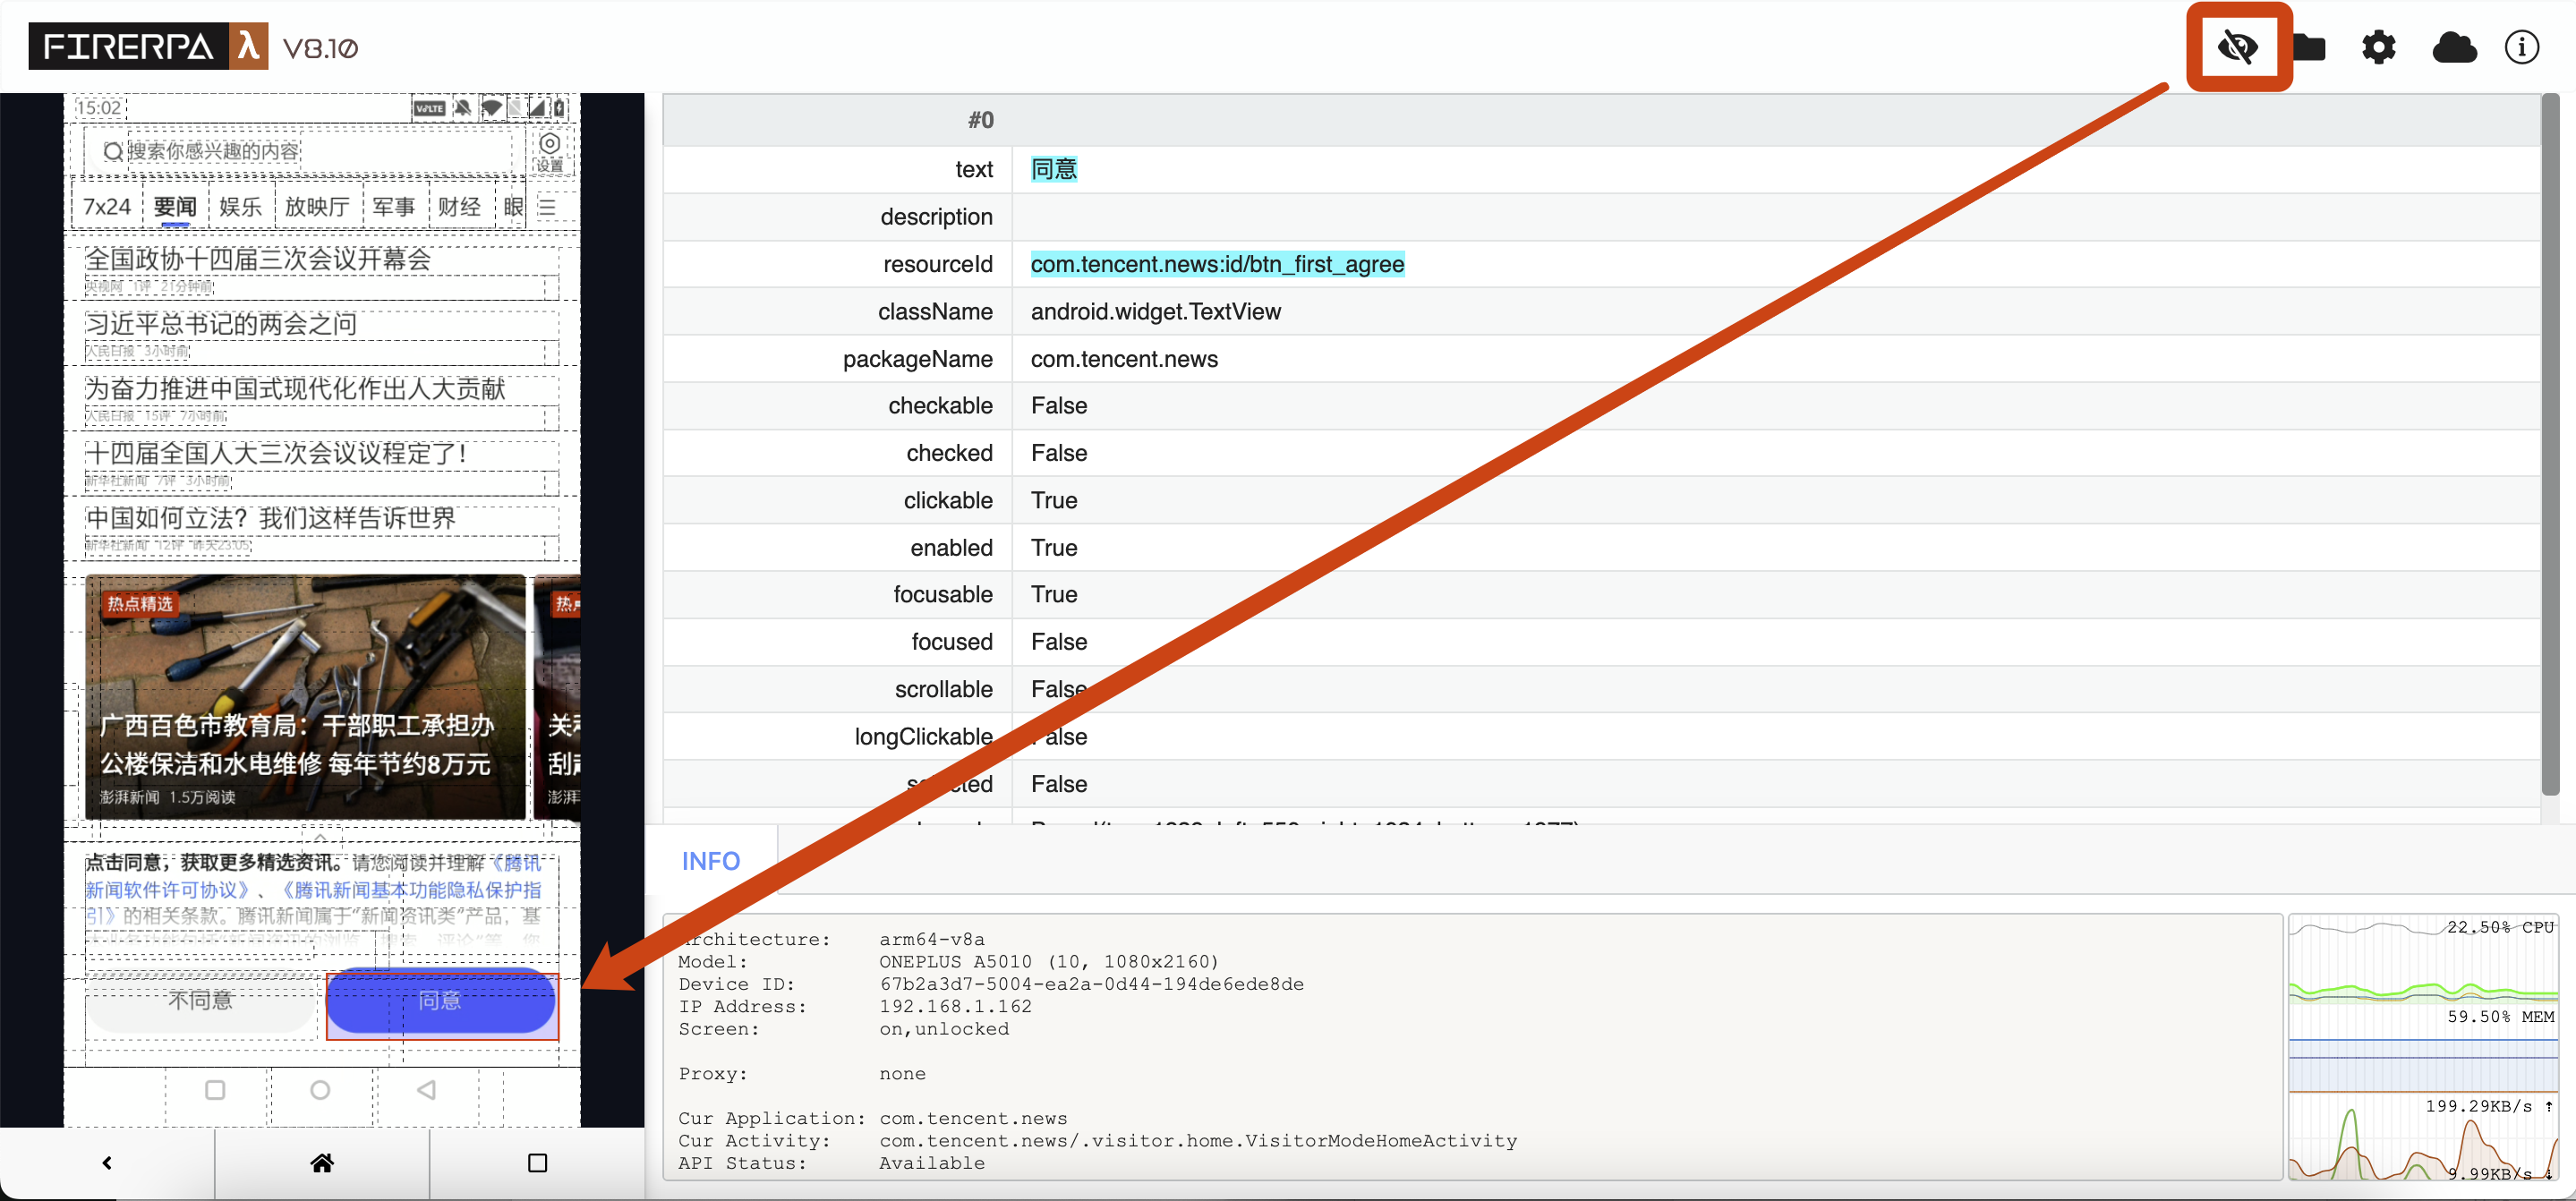
You can see the element information on the right, such as text, resourceId, etc. Suppose we want to click this element; you can write code like the following, which means "click the element with text '同意' (Agree)".
d(text="同意").click()
Note
This is just an example; there are many ways to write selectors. Here we only introduce the simplest one.
Alright, now you know the simplest way to write it. Next, by writing control logic like if/else, combined with interfaces like exists, you can implement a complete set of automated operation processes. See, it's not that difficult.
Interface Layout Inspection
Under normal circumstances, writing automation code cannot be done without interface layout inspection, which is also the only way to obtain selector conditions. First, open the device's remote desktop in a browser. Then click the eye icon in the upper right corner of the remote desktop to enter layout inspection. At this point, you can click on the dashed boxes on the left screen to view the corresponding element information, using its attributes as parameters for the selector. Clicking the eye icon again will close layout inspection. Please note that layout inspection does not automatically refresh with page changes; it always stays on the screen layout at the moment you entered inspection. If you need a refresh, manually press the shortcut Ctrl + R.
Hint
You can also press the Tab key in the layout inspection interface to cycle through all elements.
Interface Selector
The interface selector (Selector) is used to manipulate Android elements. You can think of it as similar to XPath rules; although the mechanism is different, the purpose is similar. In FIRERPA, the selector class is Selector, but in most cases you won't need to interact with it directly. In the previous text, you have already seen its usage. A complete Selector includes the following optional parameters.
In most cases, only resourceId, text, description, textContains, etc., are used as parameters. If the element has a proper resourceId, you should use it as the Selector preferentially, e.g., d(resourceId="com.xxx:id/mobile_signal"); otherwise, you can use text, e.g., d(text="点击进入"), or a fuzzier one like d(textContains="点击"). description is similar to text, but description is used less frequently.
Hint
A Selector is composed of the main parameters you obtain through the interface layout inspection feature described above.
Screen Coordinate Definition
In the process of automation, there will inevitably be situations where you need to operate based on precise coordinates or area coordinates. You might not be familiar with the concept of coordinates yet, so here we introduce knowledge about Android screen coordinates. Just like an image, a screen has a resolution. For Android screens, whether in portrait, landscape, or auto-rotate mode, the top-left corner is uniformly taken as the origin (0,0), the right direction is the positive direction of the X-axis, and the downward direction is the positive direction of the Y-axis, forming a coordinate system, as shown in the figure.
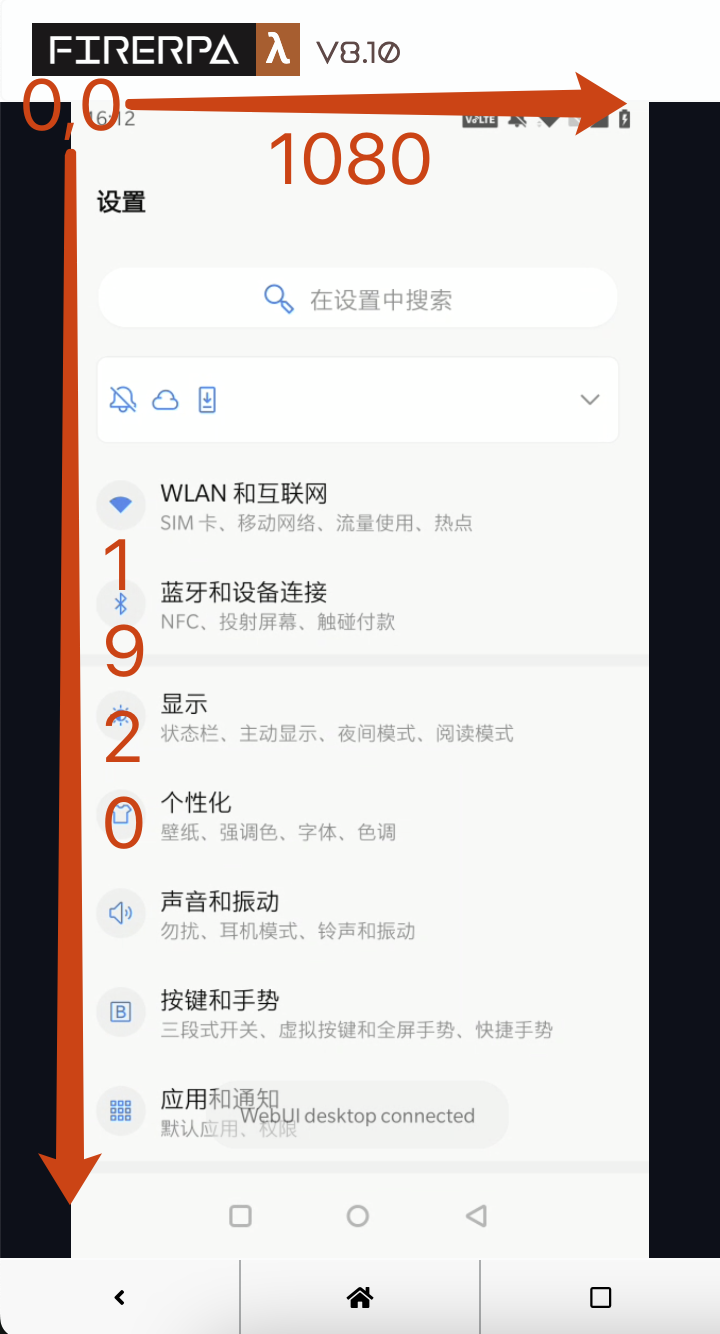
From the diagram, we can see that the top-left corner is (0,0), top-right is (1080,0), bottom-left is (0,1920), and bottom-right is (1080,1920). You can calculate the coordinates of any point on the screen based on this information.
Note
Regardless of whether the screen's native orientation is portrait, landscape, or auto-rotate, the top-left corner of the current orientation is uniformly used as the origin.
Points on the Screen
In FIRERPA, some operations (such as clicking or taking screenshots) require you to provide area or coordinate information. For common coordinate points, we use the following definition, which represents a point on the screen with coordinates (100,100).
Point(x=100, y=100)
Definition of an Area
An area refers to a rectangular region on the screen. Its definition is a bit more complex; please read carefully. We use Bound to represent an area on the screen, which requires four parameters: top, left, bottom, right. You might be a bit confused; please be sure to understand carefully: top represents the pixel distance from the top edge of the rectangle to the top of the screen, left represents the pixel distance from the left edge of the rectangle to the left of the screen, right represents the distance from the right edge of the rectangle to the left of the screen, and bottom represents the distance from the bottom edge of the rectangle to the top of the screen. In short, all distances are X/Y axis distances based on the top-left corner origin of the screen. The following figure helps to understand; the phone screen is still 1080x1920, currently in portrait mode.
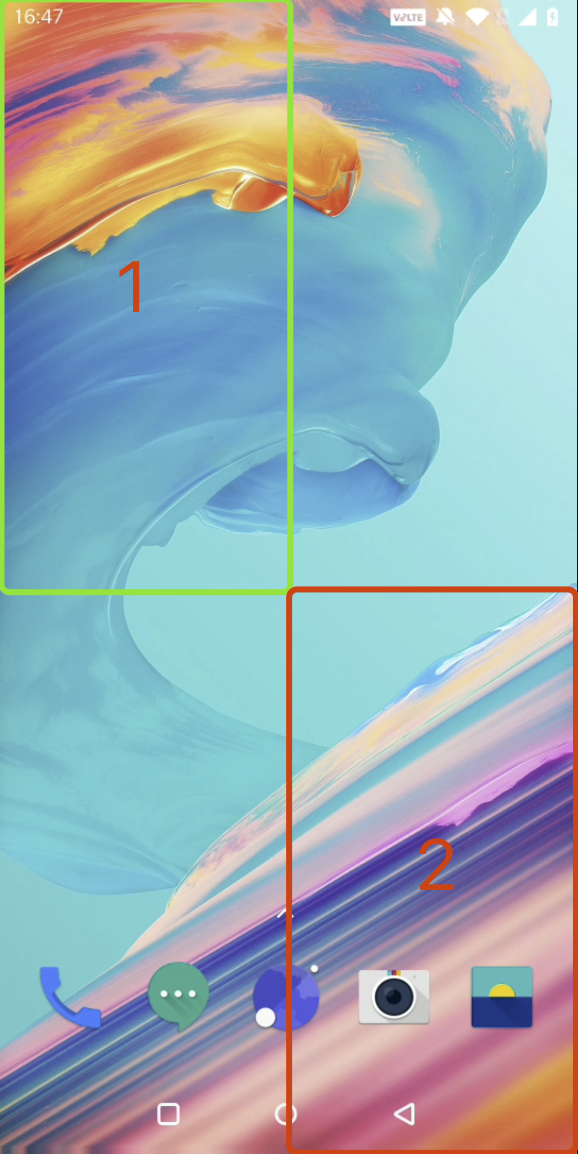
Now suppose the screen is divided into four equal parts, and we need to get the definitions of the top-left and bottom-right areas shown in the figure. According to the rules, Area 1: the distance from the top of the rectangle to the screen top is 0 pixels, the distance from the left to the screen left is 0 pixels, the distance from the bottom to the screen top is 960 pixels (1920÷2), and the distance from the right to the screen left is 540 pixels (1080÷2), so its definition is
Bound(top=0, left=0, right=540, bottom=960)
Similarly, Area 2: the distance from the top of the rectangle to the screen top is 960 pixels, the left to the screen left is 540 pixels, the right to the screen left is 1080 pixels, and the bottom to the screen top is 1920 pixels, so its definition is
Bound(top=960, left=540, right=1080, bottom=1920)
Data of Android Applications
Every Android application has its dedicated data directory on the device. Usually, application data is stored under the /data directory. You can obtain the application's data directory by calling the d.application("com.example").info() interface. In most cases, you can also directly cd to /data/user/0/com.example.test to enter the user directory. Besides /data, some applications also store multimedia and other files in the /sdcard/Android directory.
Viewing the SMS Database
Sometimes, you may want to check where the SMS received by the device is stored. This is very simple; you can even write an extension to read the content directly and get it in real time via an HTTP interface! We will introduce it in the conventional Android way; if your situation is different, please expand accordingly. On Android, the package name of the SMS app is usually com.android.mms, so you can switch to the directory /data/user/0/com.android.mms. Through the following operations, you will see several databases under the databases directory, among which mmssms.db is the one we are looking for.
 λ 10:12 /data/user/0/com.android.mms ➥ ls -la
total 82
drwx------    7 u0_a78   u0_a78        3452 Jan  2  2021 .
drwxrwx--x  381 system   system       53248 May  2 16:46 ..
drwxrws--x    3 u0_a78   u0_a78_c      3452 Jan  2  2021 cache
drwxrws--x    2 u0_a78   u0_a78_c      3452 Jan  2  2021 code_cache
drwxrwx--x    2 u0_a78   u0_a78        3452 Jan  2  2021 databases
drwxrwx--x    7 u0_a78   u0_a78       24576 Feb 26 13:43 files
drwxrwx--x    2 u0_a78   u0_a78        3452 May  4 10:12 shared_prefs
 λ 10:12 /data/user/0/com.android.mms ➥ ls -l databases/
total 504
-rw-rw----    1 u0_a78   u0_a78       24576 Jan  2  2021 dynamic_bubble
-rw-------    1 u0_a78   u0_a78           0 Jan  2  2021 dynamic_bubble-journal
-rw-rw----    1 u0_a78   u0_a78      491520 Feb 27 04:18 mmssms.db
-rw-------    1 u0_a78   u0_a78           0 Jan  2  2021 mmssms.db-journal
 λ 10:12 /data/user/0/com.android.mms ➥
Reading is very simple, because conventional application databases on Android are all SQLite. However, applications with higher security often encrypt their databases. But FIRERPA is powerful; besides supporting regular SQLite, it also supports real-time reading of WeChat (SqlCipher) AES-256, WeCom AES-128, Alibaba series SqlCrypto (AES-128) and other encrypted databases (provided you find the key yourself). Below we demonstrate a simple read of system SMS content; one command is enough, and you can also write an extension to read it.
sqlite3 databases/mmssms.db .dump
The output may be a lot, but you can quickly locate the table where the required data resides and then write SQL queries yourself. This method works for 98% of Android applications; the remaining 2% are encrypted databases.
Viewing Encrypted Databases
For encrypted databases, you need to find the database key or its generation method yourself. Below we briefly introduce how to read the databases of relevant applications, only covering how to use PRAGMA to preset keys. If you're not clear what this is, please learn about SQLite first.
WeChat series (sqlcipher)
PRAGMA cipher = "sqlcipher";
PRAGMA legacy = 1;
PRAGMA key = "database-key";
WeCom (wxsqlite)
PRAGMA cipher = "aes128cbc";
PRAGMA hexkey = "database-key"
Alibaba series (sqlcrypto)
PRAGMA cipher = "sqlcrypto";
PRAGMA key = "database-key"
Hint
Note that the database of an Android application is not necessarily placed only in the databases directory.
Viewing Other Data
Of course, the application data directory contains not only databases but also application parameters, configurations, cache, files, etc., such as shared_prefs (XML files). We won't elaborate further; you can explore on your own.
Automation Auxiliary Measures
In automation business, not all applications are suitable for selector-based positioning. Some interfaces, such as games, are rendered in real time and have no Android-level page layout. For such applications, you can only rely on OCR or image matching for detection. Please refer to the Text Recognition and Image Matching chapters for specific interfaces and usage.