Advanced UI Operations
This chapter introduces more in-depth automation APIs that you can use to perform various detailed operations. This chapter contains a lot of content. If this is your first time, we recommend that you patiently read through each section.
Tip
Get Element
You may already have some understanding of this from the basic knowledge or previous sections. You need to find the relevant element through a selector before you can operate on it. You should also have seen where to get the selector parameters. The following introductions will revolve around this element. You can see the relevant information for the "同意" (Agree) element on the right side of this image.
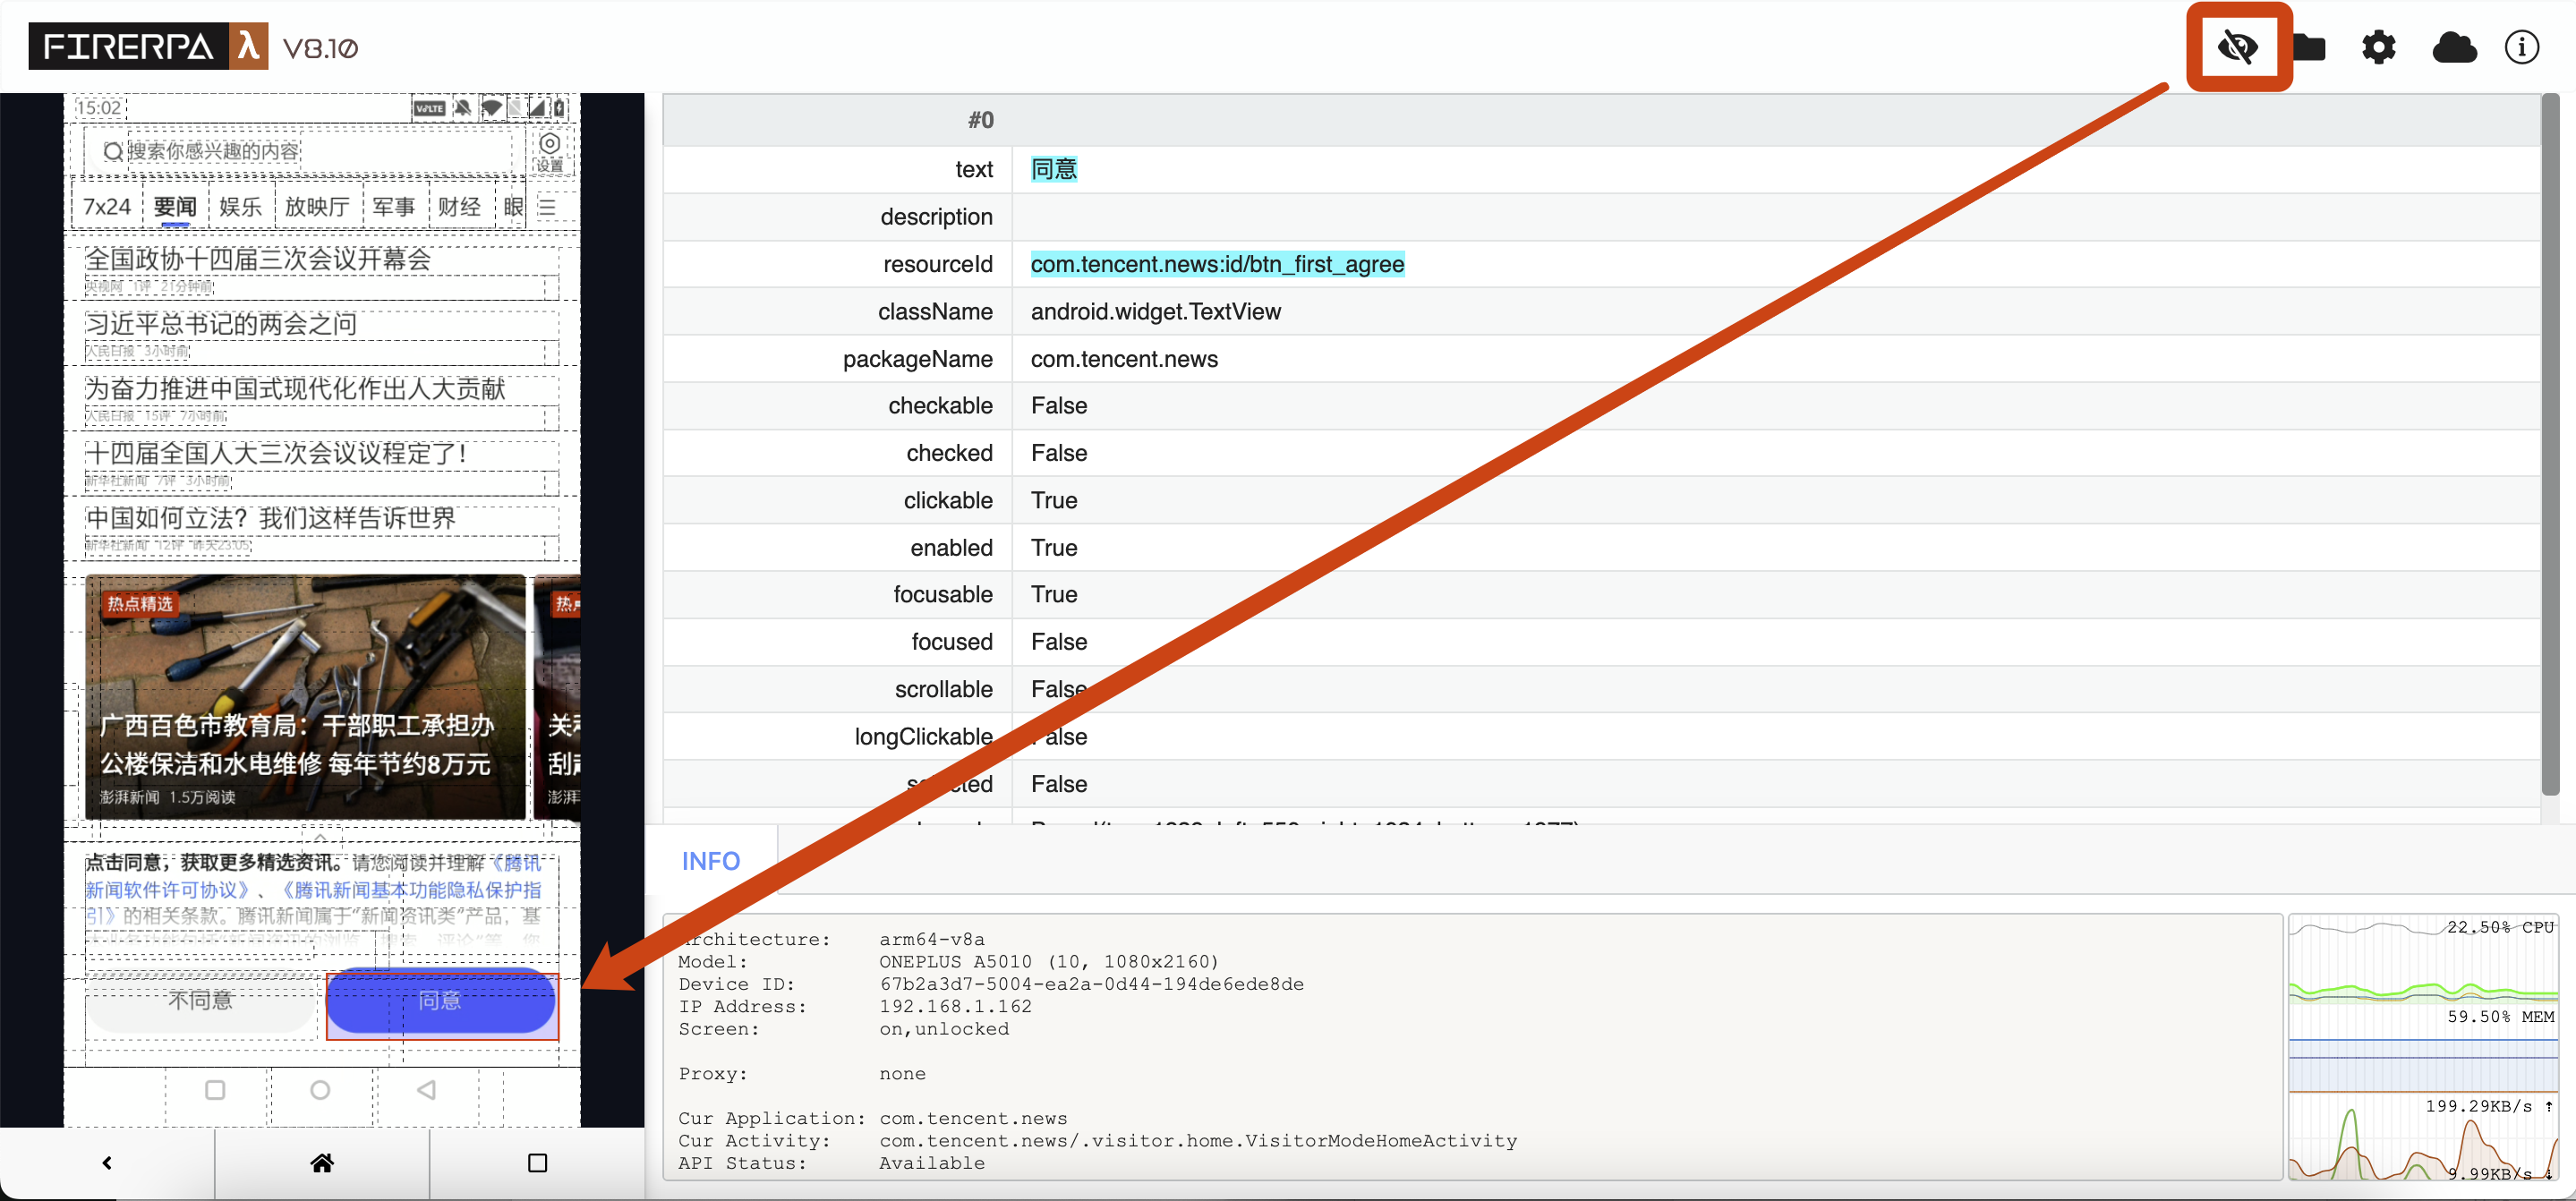
Attention
For the element above, we generally get it by text. The condition for using text is that there is no other element on the current interface with the text "同意". This is the simplest method. Alternatively, you can use resourceId, but you need to be aware that resourceId here does not represent a unique ID; it represents a resource ID, and an interface may contain many elements with the same resource ID. Others like packageName, checkable, etc., are generally not commonly used, but if text, resourceId, description, etc., are not available, you can try using these fields. We can get this element in the following ways.
element = d(text="同意")
element = d(text="同意", resourceId="com.tencent.news:id/btm_first_agree")
element = d(resourceId="com.tencent.news:id/btm_first_agree")
Element Click
Call the following API to perform a normal element click operation. The context will demonstrate the effect of manually clicking "Agree".
element.click()
If you need to specify the position to click on the element, you can specify corner. Corner.COR_CENTER means clicking the center point of the element. You can also click its top-left or bottom-right corner (COR_BOTTOMRIGHT).
element.click_exists(corner=Corner.COR_TOPLEFT)
Performs a long-press operation on the element. Throws an exception if it does not exist. This API also supports corner, but the long-press duration cannot be specified.
element.long_click()
Clicks the element if it exists. If the element does not exist, calling this API will not raise an exception. This API also supports corner.
element.click_exists()
>>> element.click_exists()
True
Check Existence
In many cases, you need to check for the existence of an element before proceeding with further operations. Otherwise, subsequent processes may encounter exceptions or perform incorrect actions on the wrong interface. You may need to use the following API for existence checks in certain situations.
element.exists()
Element Information
In some cases, you might want to get partial information about an element, such as its coordinates, area, or string information like the text or description it contains. You can use the following API to read element information.
element.info()
For our test element mentioned above, the output information is as follows:
>>> info = element.info()
>>> print (info)
bounds { ... }
className: "android.widget.TextView"
clickable: true
enabled: true
focusable: true
packageName: "com.tencent.news"
resourceName: "com.tencent.news:id/btn_first_agree"
text: "\345\220\214\346\204\217"
visibleBounds { ... }
Hint
As you can see, this information is relatively complex. This is the default print format for protobuf. You can directly access the corresponding properties to print their actual values. For example, to read the text value of an element, you can use it as shown below.
>>> info = element.info()
>>> print (info.text)
同意
Of course, there is also information related to the element's area and coordinates, which you can also access. For example, if you want to get the area information of the element, you can use it as shown below to print the area information. You can also assign it to a variable for subsequent operations.
>>> info = element.info()
>>> print (info.bounds)
The output or returned value is area information (Bound). You will later find that this is a parameter also used by a certain screenshot API. Yes, you can pass this parameter to the screenshot API to take a screenshot of this element alone, but we have already encapsulated this for you.
You might also want to get the width and height of the element to calculate certain offsets, such as the offset of other relative elements. You can do this:
>>> info = element.info()
>>> print (info.bounds.width, info.bounds.height)
484 138
Or, get the center point of the element, or corner points like the top-left and bottom-right. Of course, the following APIs usually return Point information, and you can get the corresponding X and Y axis screen coordinates from the Point object.
>>> info = element.info()
>>> print (info.bounds.center())
x: 792
y: 1908
>>> print (info.bounds.center().x)
792
The following call is used to get the coordinates of the element's corners. The example gets the coordinates of the top-left corner. It also supports getting the coordinates of all four corners, such as bottom-right, top-right, and bottom-left.
>>> info = element.info()
>>> print (info.bounds.corner("top-left"))
x: 550
y: 1839
>>> print (info.bounds.corner("top-left").x)
550
Iterate Elements
You can also iterate through all elements selected by the selector. Normally, there might be only one element in the context, so if you are testing, please choose another selector for testing. You can iterate directly on the selector using a for loop or other methods.
for i in element: print (i)
Or, if you know that there are multiple matching elements and you want to get the Nth matching element, you can use the following API.
element_3rd = element.get(3)
Count Elements
You will not usually use this API directly. The following call can get the number of elements matched by your current selector.
>>> element.count()
1
Element Screenshot
We support element-level screenshots, allowing you to capture the image of an element individually without taking a full-screen screenshot and then cropping it.
element.screenshot(quality=60)
After taking a screenshot, you can directly use getvalue to get the binary data of the screenshot, or pass it directly to a PIL Image.
>>> element.screenshot(quality=60).getvalue()
b'\xff\xd8\xff\xe0\x00\x10JFIF\x00\x01\x01\x00\x00\x01\x00\x01\x00\x00\xff\xe2\x02(ICC_PROFILE\x00\x01\x01\x00\x00\x02\x18\x00\x00\x00\x00\x02\x10\x00\x00mntrRGB XYZ \x00\x00...
Alternatively, if you don't need to process it further, you can choose to save the screenshot directly to a local file.
>>> element.screenshot(quality=60).save("image.png")
Wait for Element
In some cases, you may need to determine if the current page has finished loading. Usually, you can determine if the page has loaded by checking if a relevant element is displayed. The following example will wait for the "同意" (Agree) element to appear, with a maximum wait time of 10 seconds.
Hint
element.wait_for_exists(10*1000)
>>> element.wait_for_exists(10*1000)
True
Of course, we not only support waiting for an element to appear but also support waiting for an element to disappear, that is, until the element is gone from the interface.
element.wait_until_gone(10*1000)
>>> element.wait_until_gone(10*1000)
False
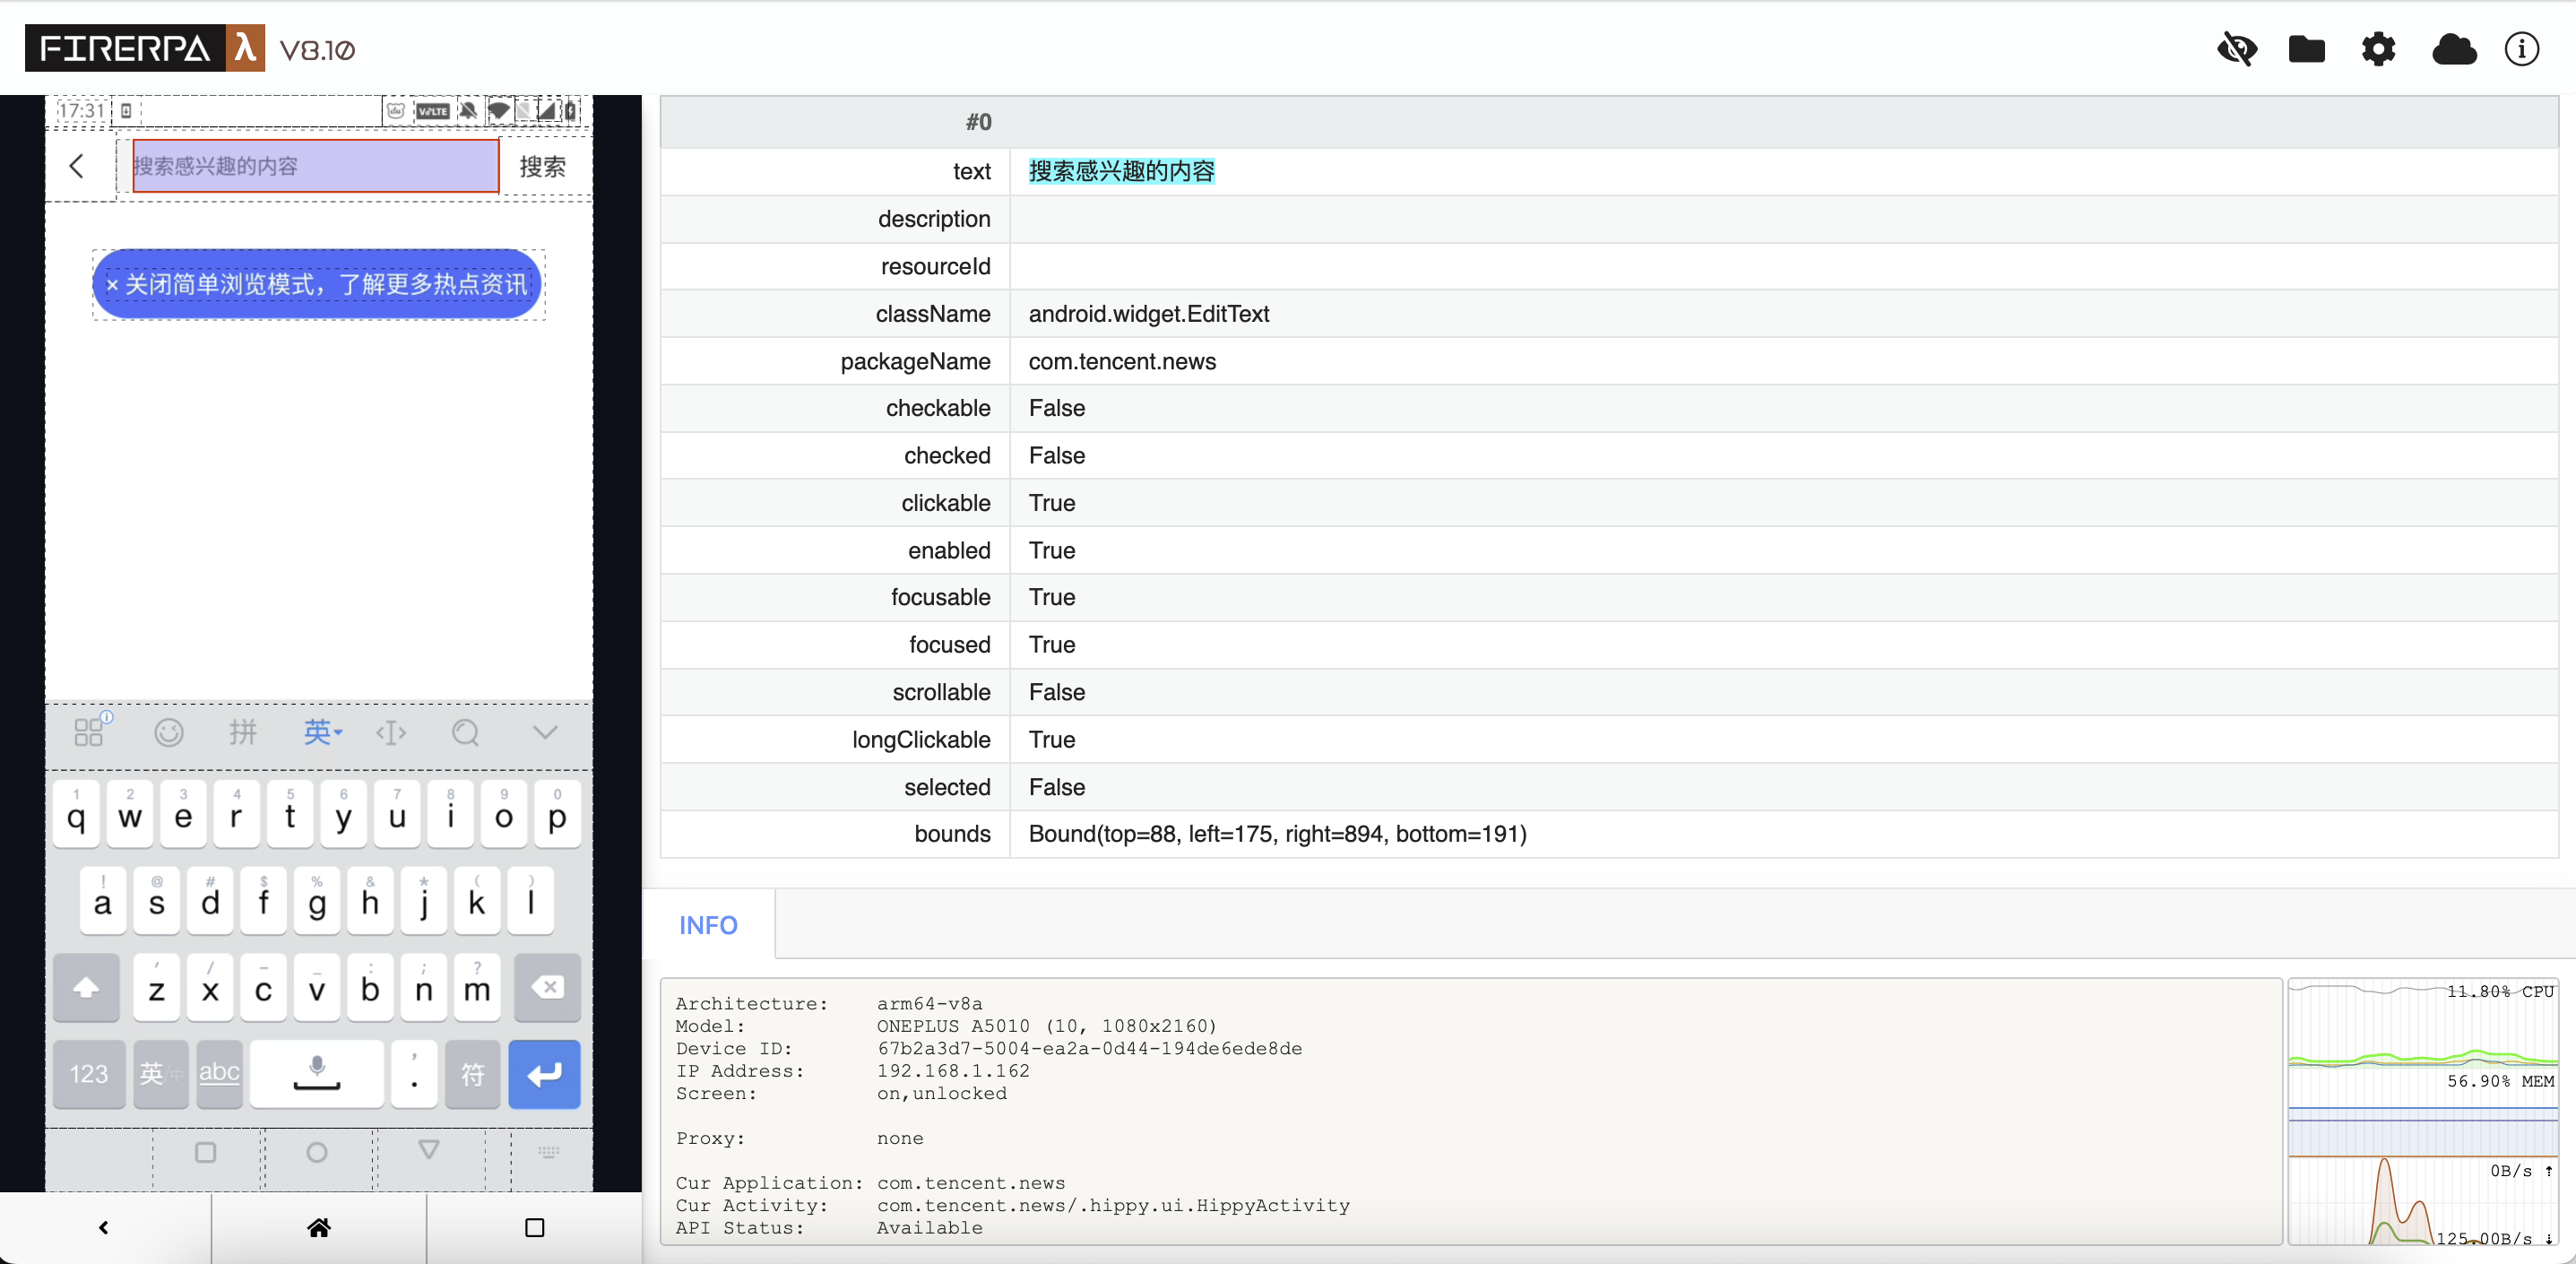
Text Input
Text input is a relatively important area to pay attention to. We cannot input text into an "Agree" button because it is a button. Now, let's take an input box element as an example. The basic information of this element is as follows.
Attention
Hint
For the input box above, we can call the following API to input the string "你好世界" (Hello World) into it. It also supports inputting English or other Unicode strings. You just need to use it as shown below to input text into the box.
>>> element = d(text="搜索感兴趣的内容")
>>> element.set_text("你好世界")
True
Or, if you suddenly want to get the text currently displayed in this input box, you can call it like this.
Attention
>>> element = d(className="android.widget.EditText")
>>> element.get_text()
'你好世界'
Or, to clear the currently entered content. Usually, entering text will automatically clear the previous text, but you can also clear it manually.
Hint
>>> element = d(className="android.widget.EditText")
>>> element.clear_text_field( )
True
Note
Normal Swipe
Use the following API to perform swipe operations on the interface, such as swiping up and down to scroll through a list. The following call implements an upward swipe. Adjust step as needed; a larger value will result in a slower swipe speed, which is more suitable for swipes requiring high precision.
Attention
d().swipe(direction=Direction.DIR_UP, step=32)
>>> element = d(resourceId="com.tencent.news:id/important_list_content")
>>> element.swipe(direction=Direction.DIR_UP, step=32)
True
Fling (Fast Swipe)
A fling is similar to a person quickly swiping the screen. This operation will swipe the screen quickly, suitable for simulating operations like fast browsing. The following example flings the screen from top to bottom. The selector is empty in the example; you still need to decide whether to fill in the selector based on the actual situation.
d().fling_from_top_to_bottom()
Fling from bottom to top.
d().fling_from_bottom_to_top()
Fling from left to right.
d().fling_from_left_to_right()
Fling from right to left.
d().fling_from_right_to_left()
Attention
>>> element = d(resourceId="com.tencent.news:id/important_list_content")
>>> element.fling_from_bottom_to_top()
True
Updating...
Other Operations
# Drag this APP into the "Shopping" folder (modify according to the actual situation)
element.drag_to(Selector(text="购物"))

#########
# Find sibling or child elements
#########
# Sometimes there are duplicate elements or elements without distinct features, making them hard to locate.
# In such cases, you can narrow down the search scope by finding child/sibling elements.
# Child element example: In a chat login form, the input boxes are child elements of the login form.
# Sibling element example: In a chat input form, the username and password boxes are sibling elements (under normal circumstances).
form = d(resourceId="login_form")
form.child(index=1)
# This will get the element at index 0 under login_form
form.child(index=1).sibling()
# You can also find the "Forgot Password" button, which is a sibling of login_form, like this
# (though you could just identify it by its text, so this is not necessary, just for demonstration).
form.sibling(textContains="找回密码")
# They are elements themselves, and you can perform any element operation on them.


# Others, keep swiping down/left/right/up until the end is reached.
# Because it's not always possible to swipe to the end or detect if the end has been reached,
# the max_swipes parameter is required.
d().fling_from_top_to_bottom_to_end(max_swipes=32)
d().fling_from_bottom_to_top_to_end(max_swipes=32)
d().fling_from_left_to_right_to_end(max_swipes=32)
d().fling_from_right_to_left_to_end(max_swipes=32)

#########
# scroll: A more mechanical swipe
#########
step = 60
max_swipes = 32
# Scroll down from the top by `step` steps
d().scroll_from_top_to_bottom(step)
# Scroll up from the bottom by `step` steps
d().scroll_from_bottom_to_top(step)
# Scroll right from the left by `step` steps
d().scroll_from_left_to_right(step)
# Scroll left from the right by `step` steps
d().scroll_from_right_to_left(step)

# Others, keep swiping down/left/right/up until the end is reached.
# Same description as for fling above.
d().scroll_from_top_to_bottom_to_end(max_swipes, step)
d().scroll_from_bottom_to_top_to_end(max_swipes, step)
d().scroll_from_left_to_right_to_end(max_swipes, step)
d().scroll_from_right_to_left_to_end(max_swipes, step)